MiSTer Case
I've recently been interested in FPGA-based gaming systems. These systems implement the hardware of gaming systems on a programmable FPGA to achieve very accurate "hardware emulation" of the platform. A recent popular example is the Analogue Pocket, which is an FPGA-based handheld gaming system which can interface with Gameboy and Gameboy Advance cartridges. The Pocket became quite popular and is currently sold out through 2023.
Another popular FPGA gaming system is MiSTer. MiSTer is a open-source platform designed to run FPGA "cores" for various retro gaming consoles and arcade systems. Each core is a complete implementation of a game system on an FPGA. The cores are meant to be accurate representations of the original hardware and help to archive systems which will become increasingly scarse over time. The amount of supported systems is impressive and includes a wide variety of old game consoles, arcade cabinets, and early PCs.
Some of the cores I have particularly enjoyed are:
- ao486 – a 486 PC easily configured to install DOS and some old DOS games
- Sharp X68000 – High performance PC released in Japan in 1987 with high performance for the time.
- NES/SNES/GBA – These all feel perfect with essentially zero input latency.
- PSX – The latest core, still in development as I write this, but it also feels nearly perfect.
- DoDonPachi – This is an Japanese Arcade Schmup (one of many on MiSTer!) that I have enjoyed a lot.
- Neo Geo – The MiSTer is one of the best ways to play old Neo Geo games that are challenging to obtain these days.
The project is an example of open source collaboration working well. There are frequent updates to the cores that improve the experience. As an example, the PSX core went from an early demo state to a nearly perfect implementation in a matter of months. Another example: here is a link from one of the contributors showing the process of decapping parts of an old TMNT arcade cabinet in order to reverse engineer it. There is clearly a lot of passion involved in the project and its exciting to see the constant developments.
MiSTer is based on the following components:
- DE-10 Nano Board - The main board with FGPA and an Arm Core
- SDRam Module - Not strictly required to run MiSTer, but required for most cores.
- IO Board - Not strictly required, but some nice quality-of-life improvements. The Analog board is useful if you want to connect to a CRT.

Some optional items that can be added:
- USB Hub - You will want a powered USB Hub to attach controllers, hard drives, and other peripherals. There are some designed specifically for MiSTer, but I found any of them work. You will also need an OTG->USB A adapter.
- USB Hard Drive - Storage space for CD-based games (DOS games, PSX games) will be significant if you have a large game collection. You can add a USB hard drive for additiomal storage.
- uSD Card - This will store the main MiSTer OS and most of your games. Bigger is better. I used 256GB and wished I would have gotten 512GB.
- mt32-pi hat - The MT32 pi hat works with a raspberry Pi to emulate a Roland MT32 MIDI synthesizer and can be connected directly to the digital IOs of the MiSTer FPGA. Some older PC cores (ao486, x68000) can use this as an option to significantly improve the sound quality of supported games.
I put all of these parts into a case to help with organization. There are a number of cases available for purchase, for example: here, here and, here. I did something a little more custom. Here are some of the requirements I set:
- Contain all of the add-on items and cables internally. Should reduce clutter around my TV-watching area.
- Have a "retro" feel – something that feels like a quality design from the 80's or 90's.
- Large enough to feel substantial. The MiSTer packs a lot of power and I think having a large case helps sell the "experience" of implementing these old consoles in hardware. People may assume the inside of the case is full of electronics and I am okay with that.
- Have sufficient space to include ports for retro gaming controllers. Playing console games on their original controllers is awesome – I want to enable that easily with this case.
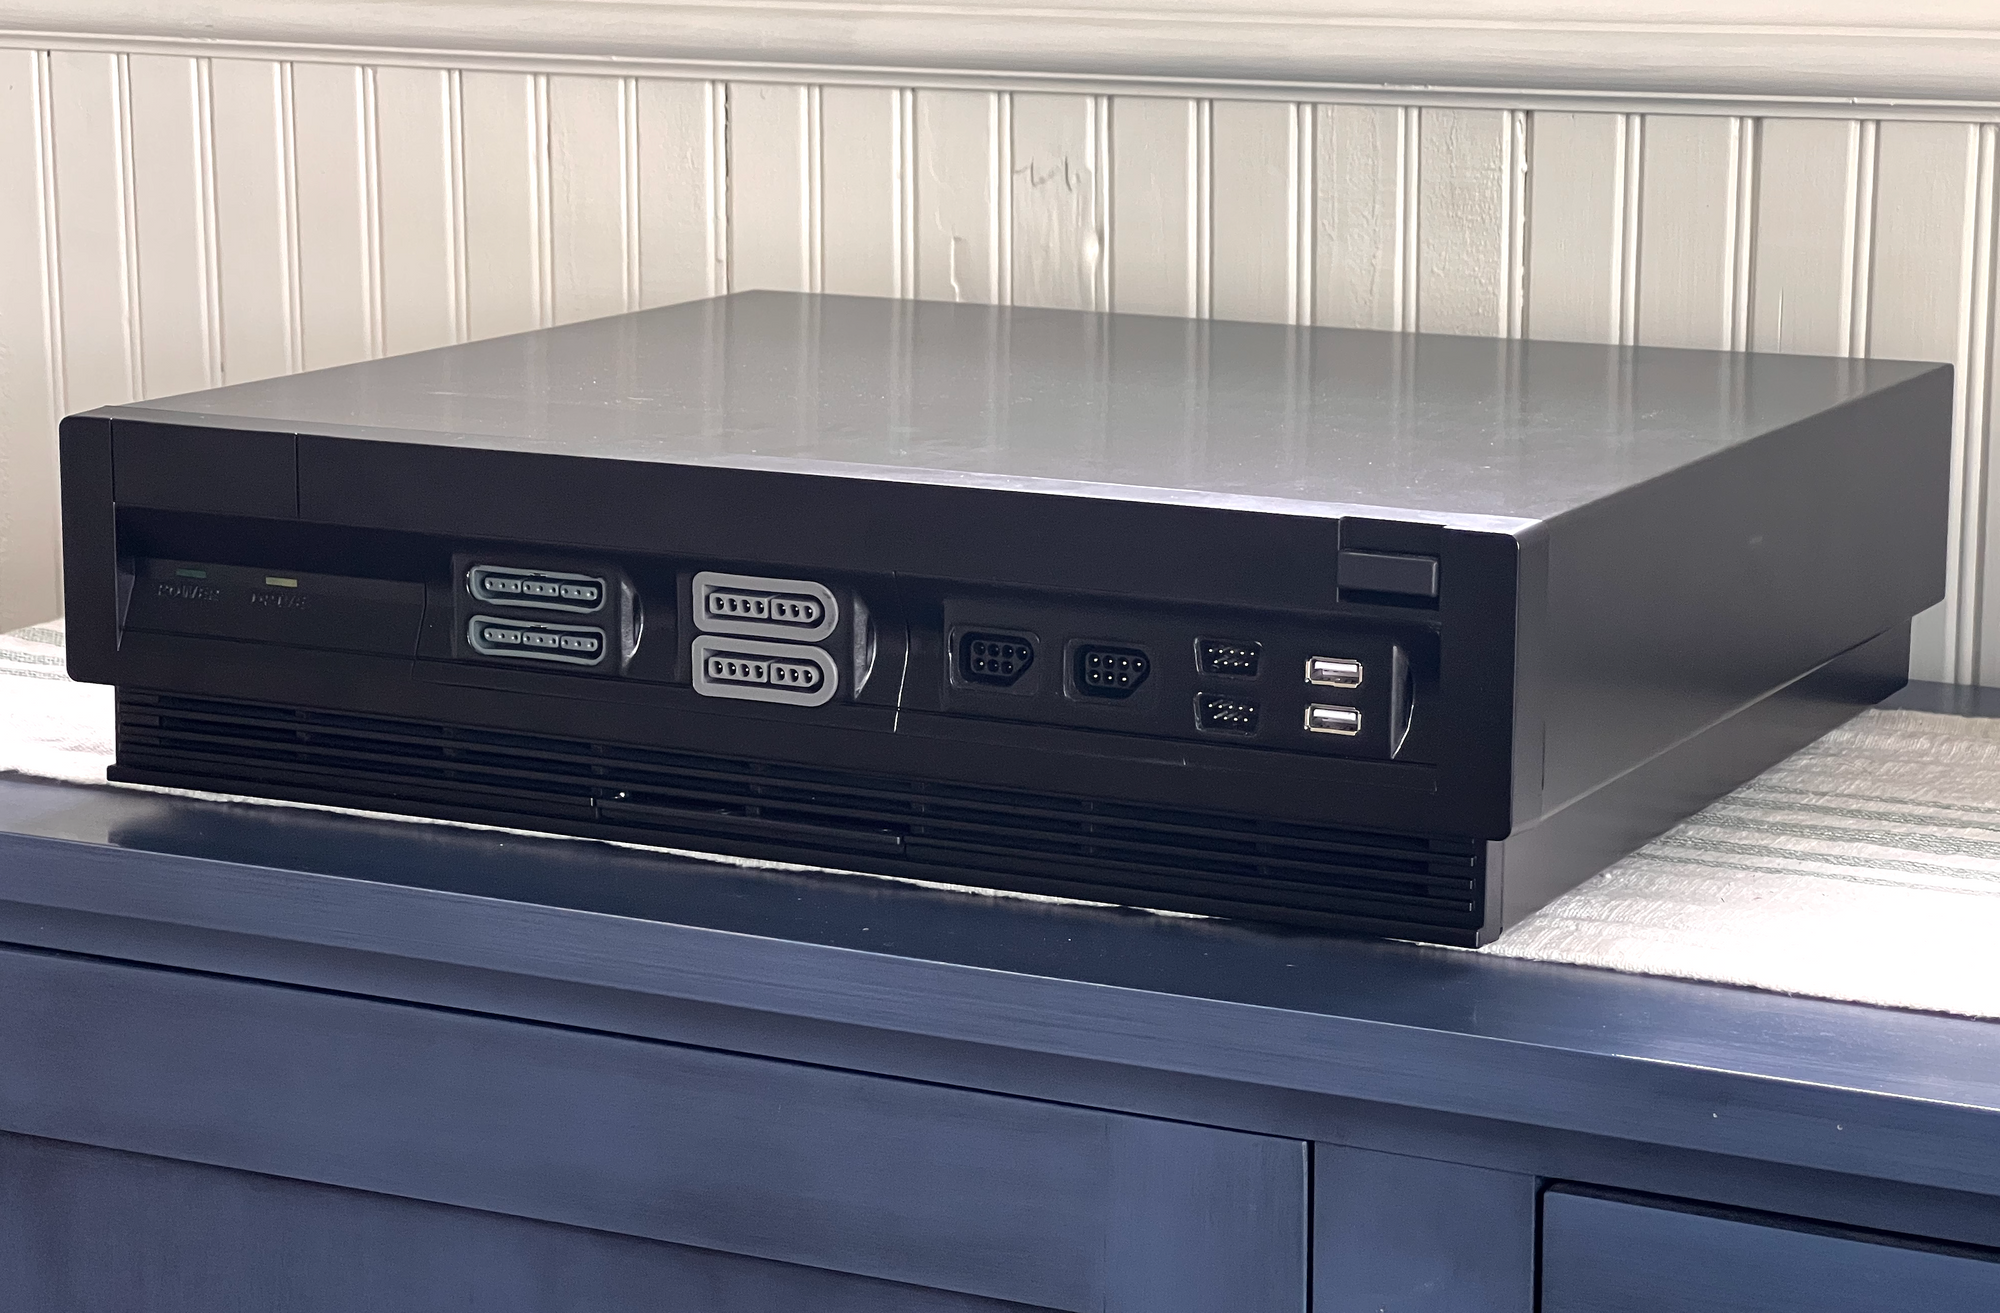
I picked the Checkmate A1500 Plus. This is a modern implementation of an old Amiga case with removeable front panels and a very retro feel. The rectangular indicator lights are a throwback to the 80's and the large pushbutton power switch reminds me of old PCs. Checkmate has smaller cases available, but I opted for the full size. I ordered the case and received it a few weeks later.
I wanted to add controller ports for NES, SNES, Genesis, and PSX. I found this adapter from "Timville" available on Tindie and purchased two of them:

For the PSX controllers, I purchased two of the Brooks adapters:

After receiving the connectors I used calipers and created a model of each. Please reach out if these models are useful for you – I can share the design files.

I then designed a generic front panel to match the design of the A1500 Plus front panels:

And then created a couple of models including a flat front section and cutouts for the controller ports.

And finally I 3D printed the new front panels:


After confirming both panels fit, I removed them fron the case and started the process of finishing the panels. The process was: Paint->Bondo->Sand->Paint, then a few additional rounds of Sand->Paint.

Once the front panels were ready, I soldered the wires for the connectors and wired the inside of the case. I purchased a latching relay from Amazon that converts the pushbutton power switch to a latching on/off relay.

And finally, finished the assembly:
